Allow us to welcome you to the crypto world! We know it’s not easy to get started in this exciting world, but we’re here to help you every step of the way. The first step is claiming your gift. And we’re going to make it easy by walking you through the process step by step.
Ready? Let’s go!
STEP 1. Creating an account
Just type your name and last name (or how your friends usually call you), add the email address and press the “NEXT” button. Ensure to enter the same email address where you received your digital gift. You’ll get a confirmation code there that is necessary for the further steps.
STEP 2. Confirmation
You have one unopened letter, so you should check your email. Right there, you’ll find a confirmation code required for the authentication. Just copy the code and paste it to the Not A Boring Gift platform. Afterwards, press the “LOGIN” button, and that’s it. You’ve successfully created a Not A Boring Gift account. Shall we go next?
STEP 3. It’s time to get to know your assets
From now on, you can access your very own Not a Boring Gift account and quickly review all your gifts, a.k.a. Bitcoin, Ethereum, or NFTs.
If you press “MY ASSETS” in the left corner, you’ll see a complete list of your digital assets. By each of them, you’ll see information about the gift sender and a personal greeting message. And the great news is that you can quickly withdraw each gift to your digital wallet.
STEP 4. Claim your gift
In case you already own a digital wallet
It’s much easier to claim gifts if you already know the process, right? So here’s a quick reminder about essential steps while withdrawing your assets.
- Make sure to choose the right gift from your asset lists and click the “WITHDRAW” button.
- Afterwards, paste your current digital wallet address in the box for that purpose (as shown in the picture below.)
- Depending on a wallet you use you have to copy your wallet address for BTC or ETH.
- Review the address one more time to avoid mistypes and ensure that your digital wallet address is written correctly, and press the “NEXT” button.
After this sequence of steps, your cryptocurrency will appear in your digital wallet. Yep, it’s that simple. Withdrawals sometimes may take up to 1-3 business days. Patience is the key but if you face any technical difficulties, please reach out to us: [email protected]
IMPORTANT: Be informed that if you enter the wrong wallet address we won’t be able to return your gift. Due to the irreversible nature of cryptocurrency protocols, transactions can’t be canceled or reversed once initiated.
In case you DON’T have a digital wallet
If this digital gift is your first collision with the crypto world – welcome to the jungle. Just kidding – today is a wonderful day to learn something new! We shall start with your own digital wallet creation. Here’s a step-by-step guide on how to create a Trust Wallet suitable for your Ethereum or Bitcoin gift.
How to create your first Trust wallet?
- First of all, download the Trust Wallet. After opening it, click on “Create a New Wallet”.
- To proceed, you will need to accept the Terms of Usage. Simply check the box then press “Continue”.
- On the screen, you’ll see 12 words in a specific order. It’s your recovery phrase which is the key to your crypto wallet. The most important part is to make sure you write it down and store it in a safe place. Losing your recovery phrases will also mean that you lose access to your wallet. Tap on “Continue” to proceed.
- If you backed up your recovery phrase, this step will be a breeze. In the correct order, select the words to complete the verification process. Click “Continue” when you are finished.
- Finally, you will be redirected to the main wallet screen. Congratulations, you’ve just created your first digital wallet!
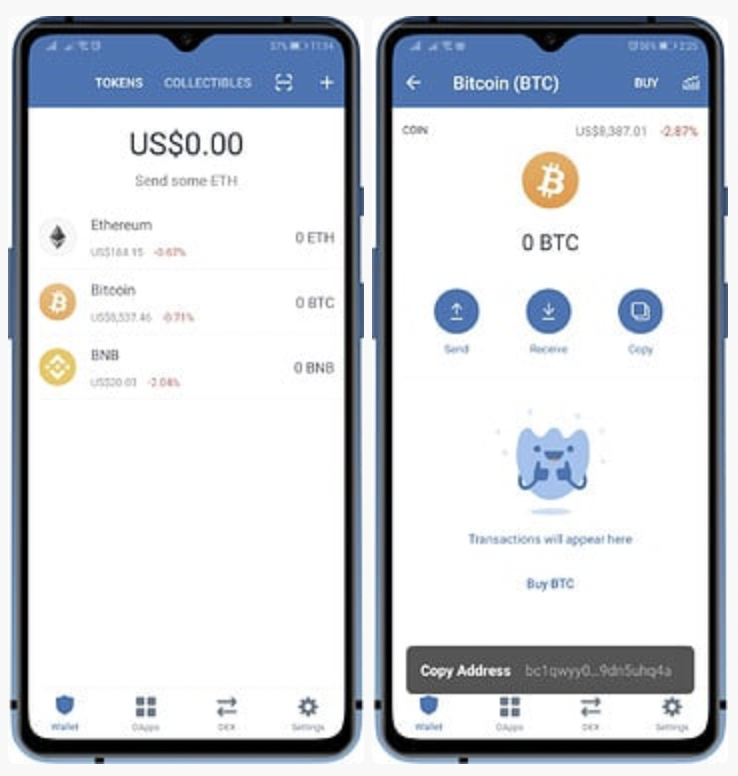
- Last step, depending on the gift you received (Bitcoin or Ethereum), find and copy your Trust Wallet address. The easiest way to get your receiving address is by opening your wallet. Select the crypto that you want, then tap on “Copy”. That’s it!
Go back to the beginning of STEP 4 and follow the instructions, which will let you send your digital gift to your personal digital wallet.
Please find the short video guide below:
In the picture below you can see where to find your Trust Wallet address:

—-
Congratulations, crypto owner! We told you that it wouldn’t be so hard.
Keep in mind that if you’re facing technical problems, don’t hesitate and reach us by email: [email protected]
In case you want to get acquainted with NFTs and the crypto gifts more, you can do so in this article.

